A car that overheats is not only a nuisance but can also cause significant engine damage if left unresolved. One common culprit behind overheating issues is a faulty thermostat. The thermostat in a vehicle plays a crucial role in regulating the engine’s temperature by controlling the flow of coolant between the engine and the radiator. If the thermostat gets stuck in a closed position, it can restrict coolant flow, leading to overheating. Fortunately, if you’re experiencing overheating, learning how to change a car thermostat can resolve the issue and save you from more expensive repairs down the line.
In this article, we’ll walk you through the steps involved in replacing your car’s thermostat. By the end, you’ll have the knowledge to tackle the task yourself and restore your vehicle’s engine cooling system to its optimal condition.
Signs That Your Car’s Thermostat Needs Replacement
Before diving into the steps of changing a car thermostat, it’s important to recognize the signs that indicate it needs to be replaced. Here are a few common symptoms:
1. Engine Overheating
The most obvious sign that your thermostat may be failing is that the engine begins to overheat. If your car’s temperature gauge is consistently in the red zone or higher, it could mean that the thermostat is stuck closed, preventing coolant from circulating.
2. Temperature Fluctuations
If you notice that your car’s engine temperature is erratic—oscillating between hot and cold—it’s a clear indication that the thermostat might not be opening and closing as it should.
3. Coolant Leaks
A stuck thermostat can cause pressure to build up in the cooling system, leading to coolant leaks. If you see coolant pooling under your vehicle or notice low coolant levels regularly, the thermostat might be malfunctioning.
4. Strange Engine Sounds or Smells
Sometimes, you might hear unusual engine sounds or notice a burning coolant smell. These are often the result of engine overheating, which can be caused by a malfunctioning thermostat.
If you’ve observed any of these signs, it’s essential to address the issue promptly by replacing the thermostat to avoid further engine damage.
Tools and Materials Needed to Change a Car Thermostat
Replacing the thermostat is a moderately challenging DIY repair that requires basic tools and a bit of patience. Before you get started, make sure you have the following tools and materials on hand:
1. New Thermostat: Purchase a replacement thermostat that is compatible with your vehicle. Consult your car’s manual or an online parts catalog for the correct part number.
2. Wrenches or Socket Set: These will be necessary to remove bolts and loosen the housing.
3. Screwdrivers: Some vehicles require a screwdriver to remove clamps or screws.
4. Coolant: Have some fresh coolant on hand to refill the system after the replacement.
5. Drain Pan: To catch any old coolant that will be drained from the system.
6. Gasket or RTV Sealant: Depending on your vehicle, a new gasket may be required for the thermostat housing. Alternatively, some people use RTV (Room Temperature Vulcanizing) sealant.
7. Gloves and Safety Glasses: Always prioritize safety when working with hot engine parts.
Once you’ve gathered everything you need, you’re ready to get started.
Step-by-Step Guide to Change a Car Thermostat
Step 1: Allow the Engine to Cool
Before starting any work on your vehicle, it’s crucial to let the engine cool down. The coolant system operates under high pressure, and working with it while it’s hot could result in burns or other injuries. Give your engine at least 30-60 minutes to cool down completely before proceeding.
Step 2: Locate the Thermostat Housing
The thermostat is typically located where the upper radiator hose connects to the engine. Depending on your vehicle’s make and model, the exact location of the thermostat housing can vary. You may need to remove the air intake system or other components to access the thermostat. Refer to your vehicle’s repair manual for precise instructions on locating it.
Step 3: Drain the Coolant
Before removing the thermostat housing, you’ll need to drain the coolant from the system. Position a drain pan under the radiator’s drain valve and open the valve to allow the coolant to drain out. Be sure to properly dispose of the coolant afterward, as it can be harmful to the environment.
Step 4: Remove the Thermostat Housing
Once the coolant has been drained, use your wrenches or socket set to remove the bolts securing the thermostat housing. Carefully remove the housing, keeping in mind that it may still have some coolant remaining inside.
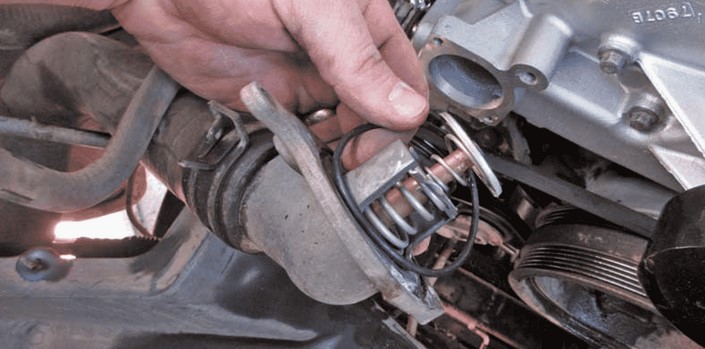
Step 5: Take Out the Old Thermostat
With the housing removed, you should be able to see the old thermostat. Take note of the position in which it’s installed, as the new thermostat will need to go in the same orientation. Remove the old thermostat and inspect the housing for any debris, corrosion, or damage. If necessary, clean the housing and check the sealing surfaces for any imperfections that might prevent a proper seal.
Step 6: Install the New Thermostat
Place the new thermostat into the housing, ensuring that it’s oriented the same way as the old one. If your vehicle requires a new gasket, make sure to install it before reattaching the housing. Some people use RTV sealant to create a better seal, but be cautious and follow manufacturer recommendations for your vehicle.
Step 7: Reassemble the Cooling System
With the new thermostat in place, reattach the thermostat housing and tighten the bolts to secure it. Make sure all connections are snug and secure to prevent leaks. If you had to remove any other components, reinstall them as needed.
Step 8: Refill the Coolant
Once the thermostat housing is securely back in place, it’s time to refill the coolant. Use the appropriate coolant for your vehicle, following the manufacturer’s specifications. Pour the coolant slowly into the radiator and the coolant reservoir, ensuring that the system is properly filled.
Step 9: Check for Leaks
Start the engine and let it run for a few minutes to circulate the coolant. Check around the thermostat housing and the cooling system for any signs of leakage. If everything looks good, proceed to the next step.
Step 10: Bleed the Cooling System
Some vehicles may have air pockets in the cooling system after the thermostat is replaced. To ensure the system is fully bled, check the coolant reservoir and top off as necessary. You may need to run the engine while the cap is off to help expel any trapped air.
Step 11: Test the Car’s Performance
Finally, take the car for a short test drive to make sure that the overheating issue has been resolved. Monitor the temperature gauge to ensure that the engine is maintaining a proper operating temperature. If the vehicle continues to overheat, the issue may lie elsewhere, and further diagnostics will be needed.
In conclusion, learning how to change a car thermostat is a valuable skill for any car owner, particularly when dealing with overheating issues. By following the steps outlined above, you can replace a malfunctioning thermostat and restore your vehicle’s cooling system to proper working order. While the process may seem daunting at first, it’s a manageable DIY task with the right tools and a little patience. Always remember to take the necessary safety precautions, and if you’re unsure about any step, don’t hesitate to consult a professional mechanic. A well-functioning thermostat ensures your engine stays cool and runs efficiently, helping to prevent more costly repairs in the future.