A properly functioning braking system is crucial to the safety and performance of your vehicle. If you’ve noticed a soft or spongy brake pedal, it could be an indication that air has entered the brake lines, compromising the hydraulic pressure needed to operate the brakes effectively. In this situation, DIY brake bleeding is an essential process to restore proper brake function. Bleeding the brakes removes any trapped air, ensuring that your brake system can function at its best, preventing potential accidents or mechanical failures. In this article, we’ll walk you through how to perform brake bleeding on your own, the tools you’ll need, and important considerations to ensure a safe and effective procedure.
Understanding Brake Bleeding
Why Brake Bleeding Is Necessary
When air enters the brake system, usually through the brake fluid reservoir or when the brake lines are opened for repairs or maintenance, it can create bubbles in the hydraulic brake fluid. These bubbles disrupt the fluid’s ability to transfer force effectively, leading to reduced braking power and a spongy brake pedal. This is especially critical because brake fluid is responsible for transmitting pressure from the brake pedal to the brake pads or drums. Air in the system can cause inconsistent or delayed braking, which can result in dangerous situations on the road.
Bleeding the brakes involves forcing the air bubbles out of the brake lines and ensuring that only brake fluid remains to perform its job. This process is vital after certain repairs, such as replacing brake pads, brake lines, or the master cylinder, or when the brake fluid has been flushed.
How Air Gets into the Brake Lines
There are several ways that air can enter your vehicle’s brake lines:
- Fluid Leaks: When brake fluid leaks due to damaged seals, gaskets, or lines, air can seep in and replace the lost fluid.
- Brake Line Repairs: If a brake line is opened during repairs, such as when changing the brake pads, air may enter the system.
- Low Brake Fluid: Running the brake system low on fluid can introduce air into the lines, especially when topping up fluid with new fluid from the master cylinder.
- Absence of Maintenance: Brake fluid absorbs moisture over time, which can lead to corrosion in the system and cause air bubbles to form in the fluid.
If you suspect air has entered the brake lines, DIY brake bleeding can help restore the system without the need for a mechanic. Below are the steps to perform the process on your own.
Step-by-Step Guide to DIY Brake Bleeding
Tools You Will Need
Before you begin, gather all the tools and materials you need:
- Brake Fluid (compatible with your vehicle’s brake system)
- Brake Bleeding Kit (a kit typically includes a collection bottle, tubing, and a one-way valve to prevent air from being drawn back into the brake lines)
- Wrench or Socket Set (for loosening the brake bleeder valve)
- Jack and Jack Stands (to lift the vehicle if necessary)
- Rubber Gloves and Safety Glasses (to protect yourself from brake fluid, which can be corrosive)
- Torque Wrench (for tightening bolts securely after the process)
Step 1: Prepare the Vehicle
Before starting, ensure your vehicle is on a level surface and the parking brake is engaged. You may need to raise the car using a jack and secure it with jack stands for easy access to the brake components. Always work on one wheel at a time, starting from the brake farthest from the master cylinder, typically the passenger-side rear brake. This ensures proper flow of fluid through the entire system.
Step 2: Locate the Bleeder Valve
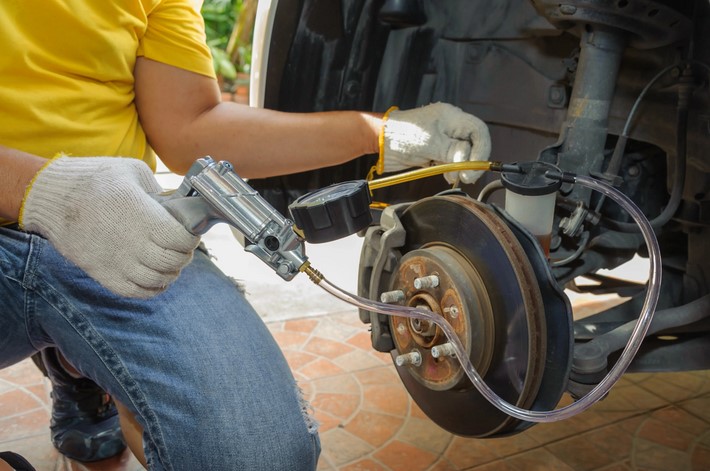
Each brake has a bleeder valve located on the brake caliper or wheel cylinder. These valves are where the air and brake fluid will be released during the process. The bleeder valve typically has a small metal screw with a hexagonal shape, which allows you to loosen and tighten it with the appropriate tool.
Step 3: Attach the Bleeder Kit
Place one end of the brake fluid hose from your brake bleeding kit onto the bleeder valve, and ensure that the other end is submerged in a container to catch the brake fluid. This will keep any contaminants from entering the system while also preventing brake fluid from dripping onto your vehicle or the ground, which could cause damage.
Step 4: Open the Brake Fluid Reservoir
Before beginning the bleeding process, open the brake fluid reservoir under the hood of the vehicle. This allows fluid to flow freely and helps prevent air from entering the master cylinder while you’re working on the brakes. Keep an eye on the fluid level throughout the process to ensure that it does not drop too low and allow air to enter the system.
Step 5: Begin Bleeding the Brakes
This step involves a two-person operation. One person will need to pump the brake pedal, while the other will loosen the bleeder valve to release the air and fluid.
- Pump the Brake Pedal: The first person should pump the brake pedal several times to build up pressure in the brake system.
- Loosen the Bleeder Valve: The second person should then quickly loosen the bleeder valve while the first person holds the brake pedal down. Fluid and air bubbles will be expelled through the tubing.
- Close the Valve: Once the brake pedal is pressed to the floor, the second person should immediately tighten the bleeder valve to prevent air from being drawn back into the system.
- Release the Pedal: The first person can now release the brake pedal, and the process is repeated until no more air bubbles appear in the brake fluid.
Step 6: Check Fluid Levels and Repeat
After each brake, check the fluid level in the master cylinder and top it off as needed to avoid drawing air into the system. Continue the process on all four wheels, starting from the farthest brake and working towards the closest.
Step 7: Test the Brakes
Once all four brakes have been bled and the fluid level is topped off, it’s time to test the brake pedal. It should feel firm and responsive. If the pedal is still spongy, it could indicate that air remains in the system, and you may need to repeat the process.
Important Considerations and Safety Tips
- Dispose of Brake Fluid Properly: Brake fluid is hazardous to both your vehicle and the environment. Be sure to dispose of any used brake fluid responsibly by taking it to a local recycling facility or auto parts store.
- Check for Leaks: After bleeding your brakes, check all brake lines and fittings for any signs of leakage. If you notice a leak, it’s crucial to address it before driving the vehicle.
- Work in a Well-Ventilated Area: Brake fluid fumes can be harmful. Always work in a well-ventilated space, and wear protective gloves and safety glasses to avoid skin contact.
Performing DIY brake bleeding is an essential skill for any car owner who wants to maintain their vehicle’s braking system in optimal condition. While the process may seem intimidating at first, it can be accomplished with the right tools and patience. By following the steps outlined above, you can remove air from the brake lines, restore the proper hydraulic pressure, and improve brake performance. Whether you’re tackling a small repair or simply maintaining your vehicle’s brake system, bleeding the brakes is a crucial part of ensuring your safety on the road. Remember, if you’re ever unsure or uncomfortable with the process, it’s always a good idea to consult a professional mechanic for assistance.