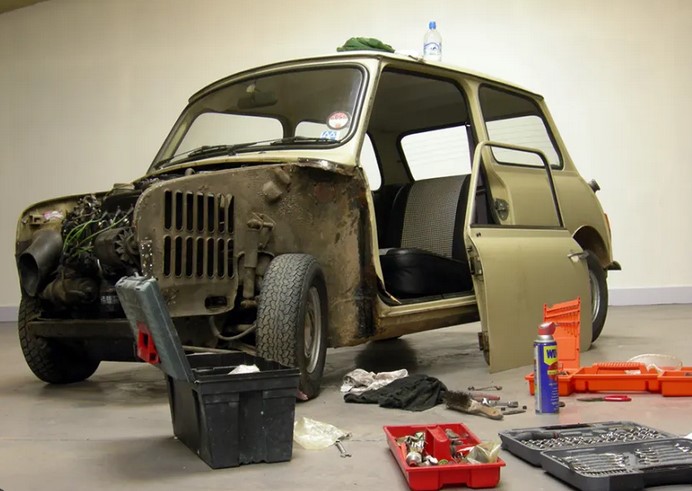
There is a distinct, unforgettable smell that accompanies every true barn find. It’s a mix of stagnant dust, ancient vinyl, decaying foam, and just a hint of vintage gasoline. To most people, it smells like a junkyard. But to those of us who have spent decades with grease under our fingernails, it smells like pure potential.
The dream of bringing a vintage machine back to life is incredibly powerful. However, over my 10-plus years in the restoration business, I’ve seen far too many projects start with roaring enthusiasm in January, only to end up as a collection of rusty, labeled sandwich bags abandoned in a garage by November.
Learning how to restore a classic car isn’t just about turning wrenches; it’s an exercise in project management, patience, and strategy. Let’s break down the exact, step-by-step roadmap to taking a vehicle from a rolling chassis back to its former showroom glory.
1. Phase One: The Assessment and Planning Strategy
Before you buy a single socket set, you need a plan. Think of this phase as laying the foundation of a house. If your blueprint is weak, the whole structure will eventually collapse under the weight of unexpected costs and missing parts.
Evaluating Rust and Structural Integrity
In the automotive world, rust is cancer. Surface rust is merely a cosmetic issue, but deep structural rot in the floor pans, frame rails, or rocker panels requires serious fabrication skills.
-
Look closely at the wheel wells and quarter panels.
-
Use a small magnet wrapped in a microfiber cloth to check for excessive body filler (Bondo). If the magnet doesn’t stick, you are looking at sculpted plastic, not metal.
Budgeting and Sourcing Parts
Multiply your initial budget by 1.5, and your timeline by two. It sounds cynical, but it’s the golden rule of automotive restoration. Modern classic cars require a steady supply of OEM (Original Equipment Manufacturer) components or high-quality reproduction parts. Before committing to a specific model, research how vibrant its aftermarket support is. Restoring a 1965 Mustang is relatively straightforward because every single bolt is reproduced today; restoring a niche 1970s European coupe will turn you into an international salvage yard detective.
2. The Teardown: Documenting the Chaos
The disassembly phase is where most beginners make their fatal mistakes. It is incredibly satisfying to rip parts off a car, but if you don’t document the process, reassembly will feel like trying to solve a 5,000-piece puzzle without the picture on the box.
The “Bag and Tag” Method
Never throw bolts into a communal bucket. Instead, use the Bag and Tag system:
-
Place every component into clear, sealable plastic bags.
-
Write the exact location, component name, and bolt size on the bag with a permanent marker.
-
Take hundreds of high-resolution digital photos from multiple angles before and during the removal of any assembly.
Pro Tip: Your future self will thank you for taking a video explaining how a complex mechanism—like the window regulator or the steering column wiring—comes apart.
3. Bodywork and Paint: Perfecting the Canvas
The shiny paint job is what everyone notices, but 90% of a jaw-dropping finish happens in the dirty, sweaty prep work that precedes it.
[Stripping Paint/Rust] ➔ [Metal Repair/Welding] ➔ [Body Filler & Block Sanding] ➔ [Priming & Painting]
Stripping to Bare Metal
To achieve a concours-level finish, you must strip the vehicle down to its raw shell. We typically use media blasting (using baking soda or crushed walnut shells) because traditional sandblasting creates friction heat that can easily warp thin vintage sheet metal.
The Art of Block Sanding
Once the metal is repaired and a high-build primer is applied, the real labor begins: block sanding. This process involves using a long, flat sanding block to level out the primer. It is a highly tactile process. You have to close your eyes and run your bare hands across the body lines to feel for minor high and low spots that the human eye cannot see.
4. Powertrain and Mechanical Rebuild: Breathing Life into the Beast
This is where we transition from aesthetics to raw mechanics. Restoring the drivetrain ensures that your classic doesn’t just look like a trailer queen, but actually performs reliably on the open road.
                  ┌──────────────────────────────┐
                  │  Mechanical Rebuild Stages   │
                  └──────────────┬───────────────┘
                                 │
         ┌───────────────────────┼───────────────────────┐
         ▼                       ▼                       ▼
┌─────────────────┐     ┌─────────────────┐     ┌─────────────────┐
│ Engine Overhaul │     │Transmission Fix │     │  Brake System   │
└─────────────────┘     └─────────────────┘     └─────────────────┘
Engine and Transmission Overhaul
Whether you are keeping the original matching-numbers inline-six or performing a modern engine swap, a complete teardown is vital.
-
Send the engine block to a reputable machine shop to check for cracks, hot spots, and to clear out decades of internal scale buildup.
-
Upgrade to modern, hardened valve seats during the cylinder head rebuild so your vintage engine can safely run on modern unleaded fuel without requiring lead additives.
Suspension, Braking, and Upgrades
While originality is highly prized, safety should never be compromised. I always advise intermediate hobbyists to consider a few subtle, hidden upgrades:
-
Disc Brake Conversions: Trading old, fading front drum brakes for dual-circuit disc brakes can literally save your life.
-
Polyurethane Bushings: Replacing dry-rotted rubber suspension bushings with modern polyurethane alternatives sharpens handling and eliminates unwanted chassis squeaks.
5. Wiring and Electrical Systems: Preventing the Fire
Vintage automotive wiring diagrams can look like a bowl of multicolored spaghetti. Decades-old insulation becomes brittle, creating prime opportunities for short circuits and devastating electrical fires.
Old Glass Fuses ───► Upgrade to ───► Modern Blade Fuses (ATC/ATO)
Instead of patching together an old, brittle harness, invest in a complete, modern replacement wiring kit. Modern kits feature fire-resistant cross-linked polyethylene wire and utilize reliable blade-style fuses rather than the notoriously problematic old glass fuses.
6. The Interior: Creating the Cockpit
The interior is your primary touchpoint with the vehicle. Restoring it requires a mix of patience, adhesive management, and attention to detail.
Sound and Heat Insulation
Before laying down fresh carpet, install a modern butyl-based sound dampening material (like Dynamat) directly onto the clean floor pans. Classic cars are notoriously noisy and poorly insulated; this single step makes the cabin feel as quiet and comfortable as a modern luxury cruiser.
Dashboard and Upholstery
Restoring a cracked vinyl dashboard or stretched leather seats takes practice. If you are a beginner, buying pre-sewn seat covers that stretch over your original seat frames is an excellent way to get professional results without needing an industrial sewing machine.
Summary Matrix: The Restoration Lifecycle
| Phase | Core Objective | Typical Challenge | Essential Tools |
| 1. Planning | Budget, scope, and parts sourcing | Underestimating hidden rust | Digital camera, spreadsheet, magnet |
| 2. Teardown | Organized disassembly | Lost or mixed-up fasteners | Labelled plastic bags, paint markers |
| 3. Bodywork | Creating a perfectly flat canvas | Metal warping from heat | Long block sanders, dual-action sander |
| 4. Mechanical | Reliability and safety | Engine scale and cooling issues | Torque wrench, engine hoist, jack stands |
| 5. Electrical | Modernizing the power grid | Brittle insulation and shorts | Wire crimpers, multimeter, heat shrink |
| 6. Interior | Cabin comfort and aesthetics | Wrinkled vinyl or headliners | Heat gun, upholstery glue, trim tools |
The Pitfalls to Avoid
⚠️ The “Shipwreck” Effect: Do not tear the entire car apart all at once if you have limited space. Focus on sub-assemblies. Rebuild the front suspension completely, box it up, and then move to the braking system. Breaking the project down into micro-wins keeps your motivation high.
Bringing It All Together
Restoring a classic car is a marathon, not a sprint. It will test your patience, empty your wallet, and occasionally make you want to throw your tools across the garage. But the very first time that rebuilt engine fires to life, clearing its throat with a crisp, mechanical roar, all the frustration evaporates. Driving a piece of rolling history that you saved with your own two hands is a feeling that cannot be replicated.
Are you planning your first build, or are you currently stuck in the middle of a difficult teardown? Let me know what car you are working on in the comments below, or ask any technical questions you have about metal prep and sourcing parts!