 The national average for a gallon of regular gasoline recently crossed the $4 mark. If you are driving an older, thirstier vehicle that averages around 20 to 25 miles per gallon (MPG), every trip to the pump feels like a mild financial mugging. I frequently hear from drivers who are tired of watching their hard-earned money evaporate into a fuel tank, asking a simple question: “How do I buy a car that stops the bleeding without burying me under a massive monthly loan payment?”
In my ten-plus years as an automotive writer and hands-on mechanic, I’ve seen the “economy car” segment undergo a massive transformation. It wasn’t long ago that choosing a budget vehicle meant driving a noisy, plastic box with hand-crank windows and the structural integrity of a soda can.
The best economy cars are no longer rolling penalties for being budget-conscious. Instead, they are highly advanced, remarkably safe, and incredibly fuel-efficient machines. Let’s pull back the curtain on the top affordable models that deliver maximum miles for minimum money.
The Efficiency Equation: A Simple Analogy
To understand why modern economy cars are so good at stretching a gallon of gas, it helps to use a simple analogy.
Think of a traditional, heavy vehicle like a professional powerlifter. It has massive muscle (a large engine) and can pull heavy loads, but it requires a staggering amount of food (fuel) just to maintain its baseline weight. A modern economy car is like a marathon runner. It sheds every ounce of unnecessary weight from its chassis, uses an aerodynamic shape to slice through the air, and optimizes its breathing via advanced valve timing to extract every bit of energy from a single drop of fuel.
[Powerlifter Drivetrain] ──► Heavy Chassis + Large Displacements ──► High Fuel Burn
[Marathon Drivetrain]    ──► Lightweight Alloy + Thermal Efficiency ──► High Fuel Economy
By prioritizing thermal efficiency—the measure of how much energy an engine actually converts into movement instead of wasting as heat—modern commuter cars achieve mileage numbers that were mathematically impossible two decades ago.
1. Toyota Prius: The Undisputed Efficiency Superstar
You cannot discuss the best economy cars without addressing the king of the hypermiling subculture. The Prius isn’t just an appliance anymore; its latest iteration pairs jaw-dropping efficiency with sleek, modern styling.
The Technical Data
The Prius utilizes a highly refined 2.0-liter four-cylinder engine paired with an electric motor to generate an exceptional EPA-estimated 57 combined MPG on its base front-wheel-drive trim.
-
The Drive: Unlike its sluggish ancestors, the modern Prius has peppy acceleration and low-slung handling that hugs the pavement beautifully. The transition between the gasoline engine and the electric motor is completely seamless.
-
The Caveat: The aggressively sloped, aerodynamic roofline pinches rear passenger headroom. If you frequently transport tall adults in the back seat, the cabin will feel tight.
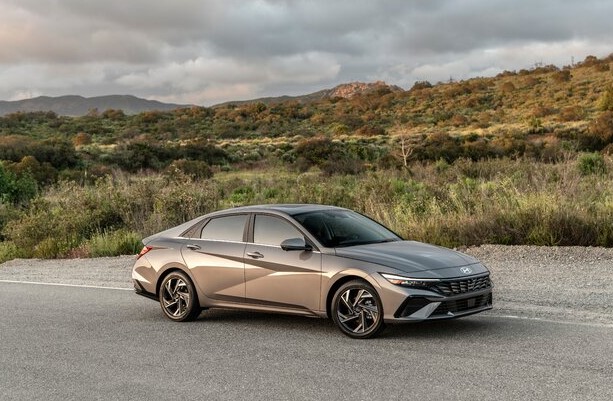
2. Hyundai Elantra Hybrid: The Value Champion
Hyundai has been quietly stealing market share from traditional segment leaders by bundling premium tech features into incredibly affordable packages.
The Technical Data
The Elantra Hybrid scores an exceptional 54 combined MPG and recently secured the top spot for value in the compact hybrid class. It pairs a 1.6-liter four-cylinder engine with a snappy six-speed dual-clutch transmission, completely avoiding the rubber-band drone typical of standard Continuously Variable Transmissions (CVTs).
1.6L Engine + 6-Speed Dual-Clutch ──► Crisp Shifts + 54 Combined MPG
-
The Drive: Because it uses a traditional geared transmission instead of a CVT, the Elantra Hybrid feels like a normal gasoline car to drive. It accelerates predictably and features a J.D. Power reliability rating of 86 out of 100.
-
The Caveat: The interior plastics on the lower door panels and lower dash feel noticeably hard and budget-oriented to help keep the entry price low.
3. Honda Civic Hybrid: The Driver’s Economy Choice
If you want to save money at the pump but refuse to give up a fun, engaging driving experience, Honda has engineered the perfect compromise.
The Technical Data
Returning with a vengeance to the lineup, the Civic Hybrid features a dual-motor hybrid system paired with a 2.0-liter engine. While official EPA numbers hover around the 50 MPG mark, it delivers a punchy 200 horsepower, making it the fastest non-Type R Civic in the fleet.
-
The Drive: Honda’s engineering team knows how to tune a chassis. The steering is sharp, the suspension dampens road imperfections without feeling floaty, and it offers up to 24.5 cubic feet of cargo room if you opt for the versatile hatchback body style.
-
The Caveat: It carries a higher starting MSRP than its Korean competitors, meaning it takes a bit longer to recoup the upfront premium through fuel savings.
4. Nissan Versa: The Pure Budget Pure-Play
What if you don’t want a complex hybrid battery pack? What if you just want the lowest possible monthly car payment on a brand-new vehicle? The Nissan Versa is the answer.
The Technical Data
As one of the sole remaining new vehicles with a starting price under $20,000, the Versa is a masterclass in basic transportation. Powered by a simple, naturally aspirated 1.6-liter four-cylinder engine, it achieves a very respectable 35 combined MPG (40 MPG highway).
-
The Drive: It is a gentle, unhurried city commuter. It won’t win any drag races with its 122 horsepower, but it comes standard with automatic emergency braking and a surprisingly quiet highway ride.
-
The Caveat: It uses a traditional cabin layout and a basic infotainment setup. If you are looking for digital flashiness, you won’t find it here.
Head-to-Head Comparison: Top Economy Contenders
| Model | Drivetrain Type | Combined EPA MPG | Starting Price Category | Best For |
| Toyota Prius | Gas-Electric Hybrid | 57 MPG | Mid-Range Premium | Maximum fuel savings, futuristic styling |
| Hyundai Elantra Hybrid | Gas-Electric Hybrid | 54 MPG | Entry-Level Value | Long warranties, high reliability scores |
| Honda Civic Hybrid | Gas-Electric Hybrid | 50 MPG | Mid-Range Premium | Commuters who still love to drive |
| Nissan Versa | Pure Gasoline (ICE) | 35 MPG | Ultra-Budget | Lowest upfront cost, simple maintenance |
Expert Advice & Hidden Warnings
⚠️ The Hidden Warning (The Payback Period Trap): Beginners often buy an expensive hybrid version of a car assuming they are saving money instantly. However, you must calculate the payback period. If a hybrid variant costs $4,000 more than the pure-gasoline version, and you only drive 5,000 miles a year, it could take you nearly eight years of driving just to break even on the fuel savings. Audit your annual mileage before upgrading to a hybrid powertrain!
💡 Pro Tip (The Direct-Injection Maintenance Rule): Many modern fuel-efficient engines use GDI (Gasoline Direct Injection) to squeeze more power out of less fuel. Because fuel no longer washes over the intake valves in these engines, carbon buildup can accumulate over time, robbing you of efficiency. To prevent this, always use “Top Tier” detergent gasoline and schedule an intake valve cleaning every 50,000 miles to keep your MPG numbers pristine.
The Verdict: Slicing Your Commuting Costs
Finding the right economy car isn’t about buying the cheapest vehicle on the lot—it’s about matching the engineering to your daily commute.
-
Choose the Nissan Versa if your primary goal is keeping your upfront purchase price and insurance premiums as low as humanly possible.
-
Choose the Hyundai Elantra Hybrid or Toyota Prius if you are a rideshare driver or have a brutal, daily stop-and-go city commute where hybrid regenerative braking can cut your fuel bill in half.
-
Choose the Honda Civic Hybrid if you want a reliable, upscale cabin that makes a 40-mile highway commute genuinely enjoyable.
Let’s Talk Economics
The days of the boring, sluggish economy appliance are officially over. You can protect your bank account from volatile oil prices without sacrificing safety or connectivity.
Are you looking to stick with a traditional, simple gasoline engine, or are you ready to let a high-efficiency hybrid system handle your daily commute? Drop your current daily mileage and budget goals in the comments below, and let’s map out your smartest financial move!